Quantcast
Channel: Tiny Solitary Soldiers
Viewing all 38 articles
Browse latest View live

5 Parsecs from home- Campaign start

$
0
0
I have been spending a lot of time messing around with rosters and QRS sheets convenient to use on my 13" laptop while playing 5 Parsecs. I don't have a printer you see. Unfortunately, in the heat of design, I accidentally deleted part of my original roster. Oops.

No matter, I'll write off the crew of the Patagonia as a test run. A story this crew heard in a bar... Which coincidentally is what I rolled for how they met. A cliche, but hey- If it's good enough for countless RPG campaign beginnings it's good enough for me.
I salvaged what I could, and rolled up what I couldn't remember. This time I used my own house rules to help generate the crew, as is suggested under "freeform characters" on page 23.
My method was to choose my set of 5 figures first. In this case, the free trader crew set from Khurasan (of course) which I have been dying to use for something for a long time.
I rolled all the human characters as normal (some of these were salvaged from my first crew, as I really liked Jella Hart, the outlaw country singer from a rich family. Archer fans will know why this is so funny) but selected "Orange class alien" and randomised between "Droid" and "warbot" for the mechanical member of the crew. I rolled 3 alien traits for Toros, and added "UNITY enforcers" as a group enemy, as Orange class aliens are hunted by the law.

Next, I simply gave each figure the weapon/weapons on the sculpt. Saves a lot of conversion headaches I would otherwise give myself. To "make up" for this, I also roll one drawback assigned to a random member of the group. (whoops, have not done this yet in the JPG)


And there's how it went down. A very eventful campaign turn and a short scuffle with the law. Feelings were hurt, jaws were hurt... Nobody made any money.
Just another day on the Fringe!

(Sadly, I got  phone call in the middle of extracting jpgs of my rosters and accidentally deleted them. That will teach me to do that. Just pics and brief write ups from now on I think.)

5 Parsecs continues

$
0
0
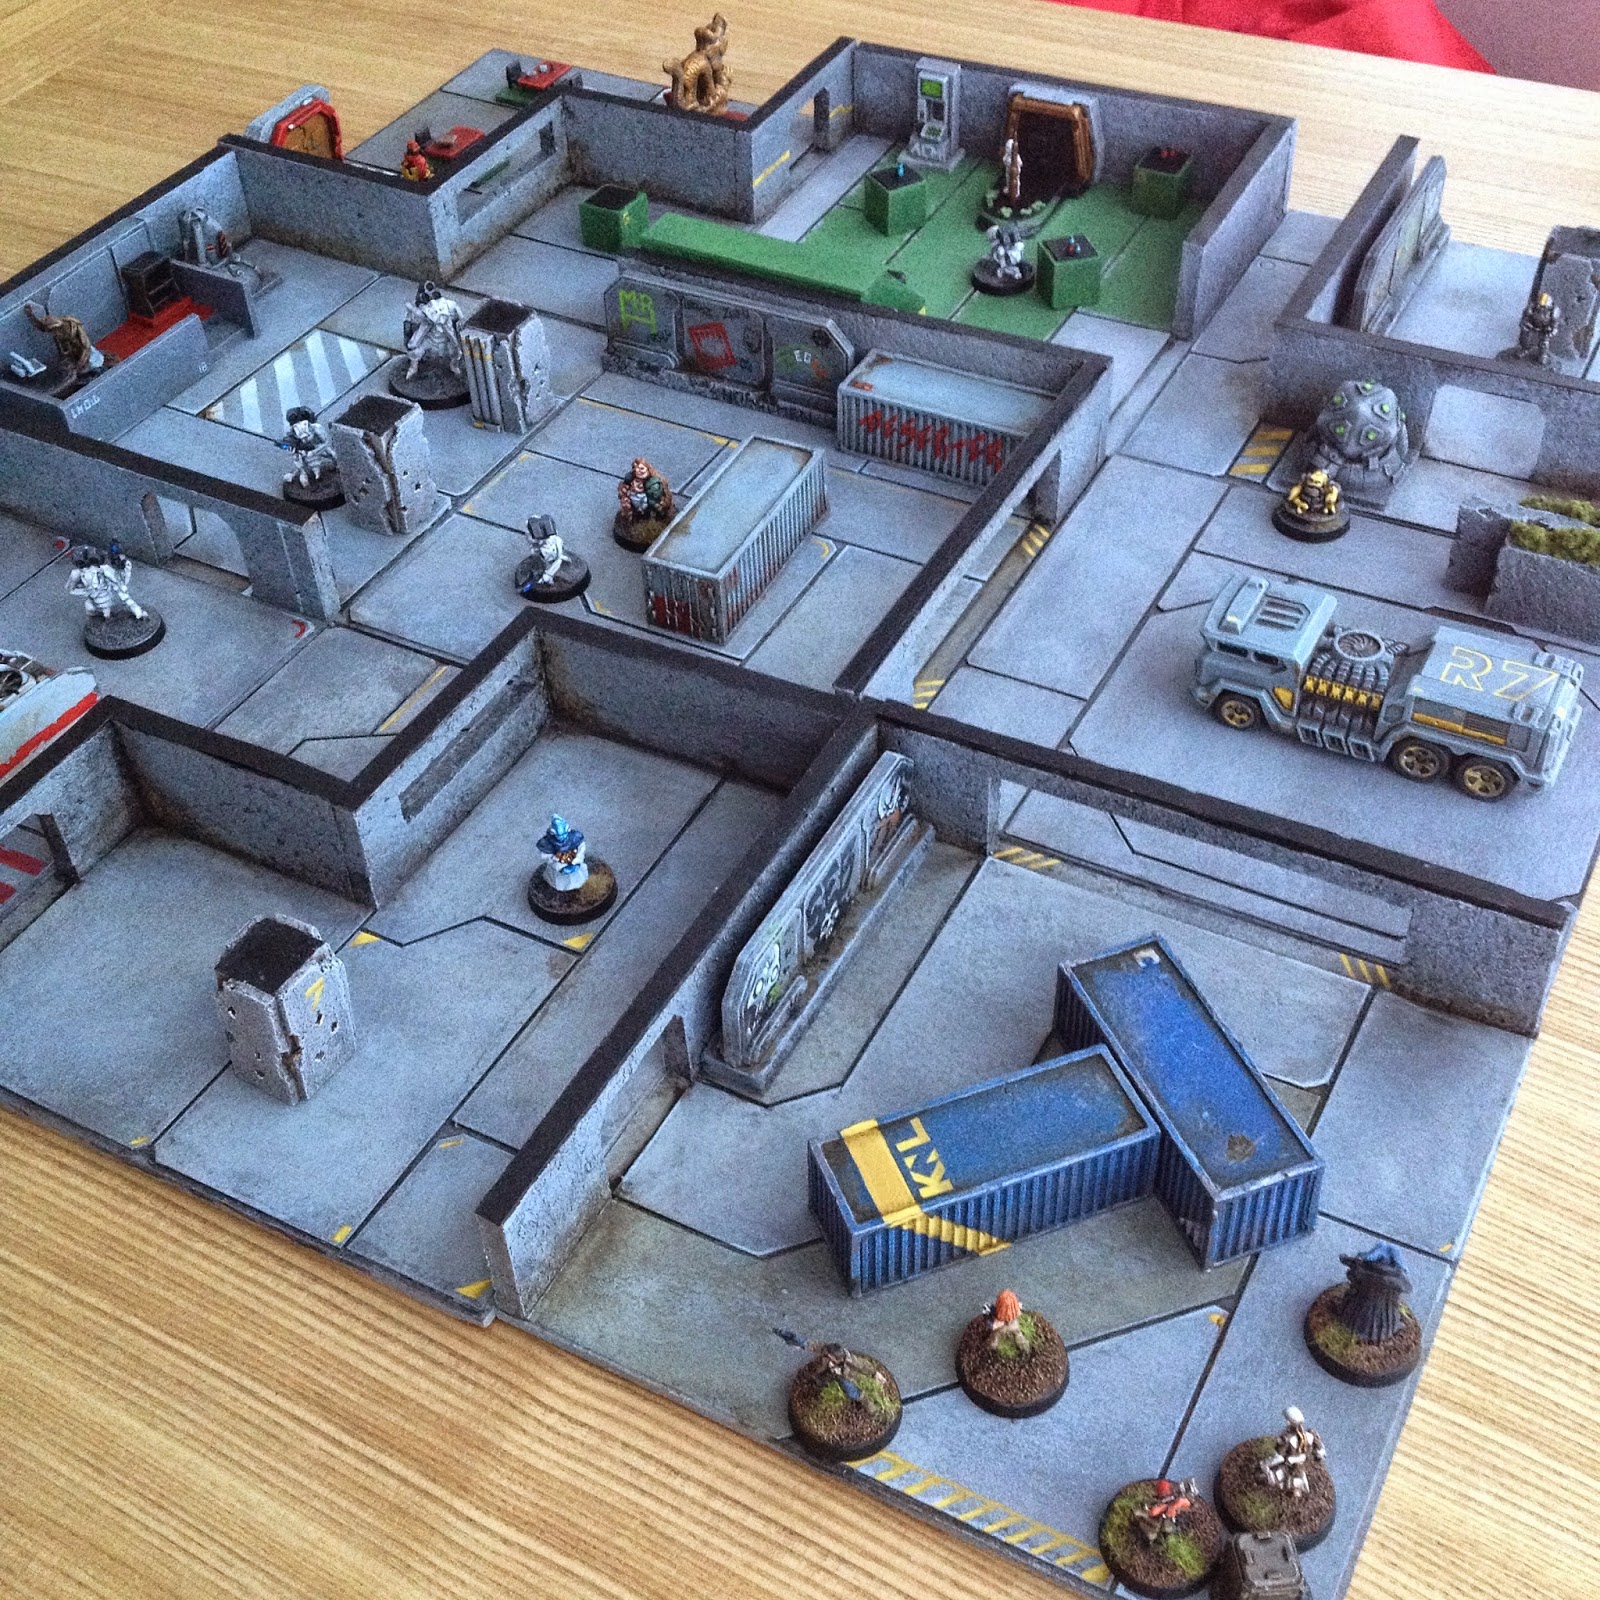
The Spaceport at game start.
Campaign turn 2.
After an uncomfortable beginning, Dash, Toros and Mackie all head into town looking for a Patron (Sending 3 crew members is an auto-success with this task).
Jella manages to get a good deal on an auto rifle at the markets, while T92 guards the ship again.

The explorer Jann Silman is holed up in his ship at the spaceport. He has an unmarked crate of goods he is unwilling to leave behind, but a group of Vespulid pirates bar the way.

I rolled 5 opponents, one a leader. They were Orange Aliens, with claws/fangs and hive mind talents... I chose my vespulid figures to represent them. This meant they were all armed with handguns, the leader with 2.

The delivery mission called for the crew to carry something to the other side of the board. As I wanted to use my interior modular scenery, I started my crew in one corner and rolled random module placement for the Vespulids by rolling a d4 for each one.

The crate would be represented by a crate model from GZG, and I ruled it could be carried 4" per turn (the speed a figure can carry a wounded comrade in the game) by one figure, or 6" per turn if carried by 2 cooperating figures. Dashing while carrying the crate is not permitted.

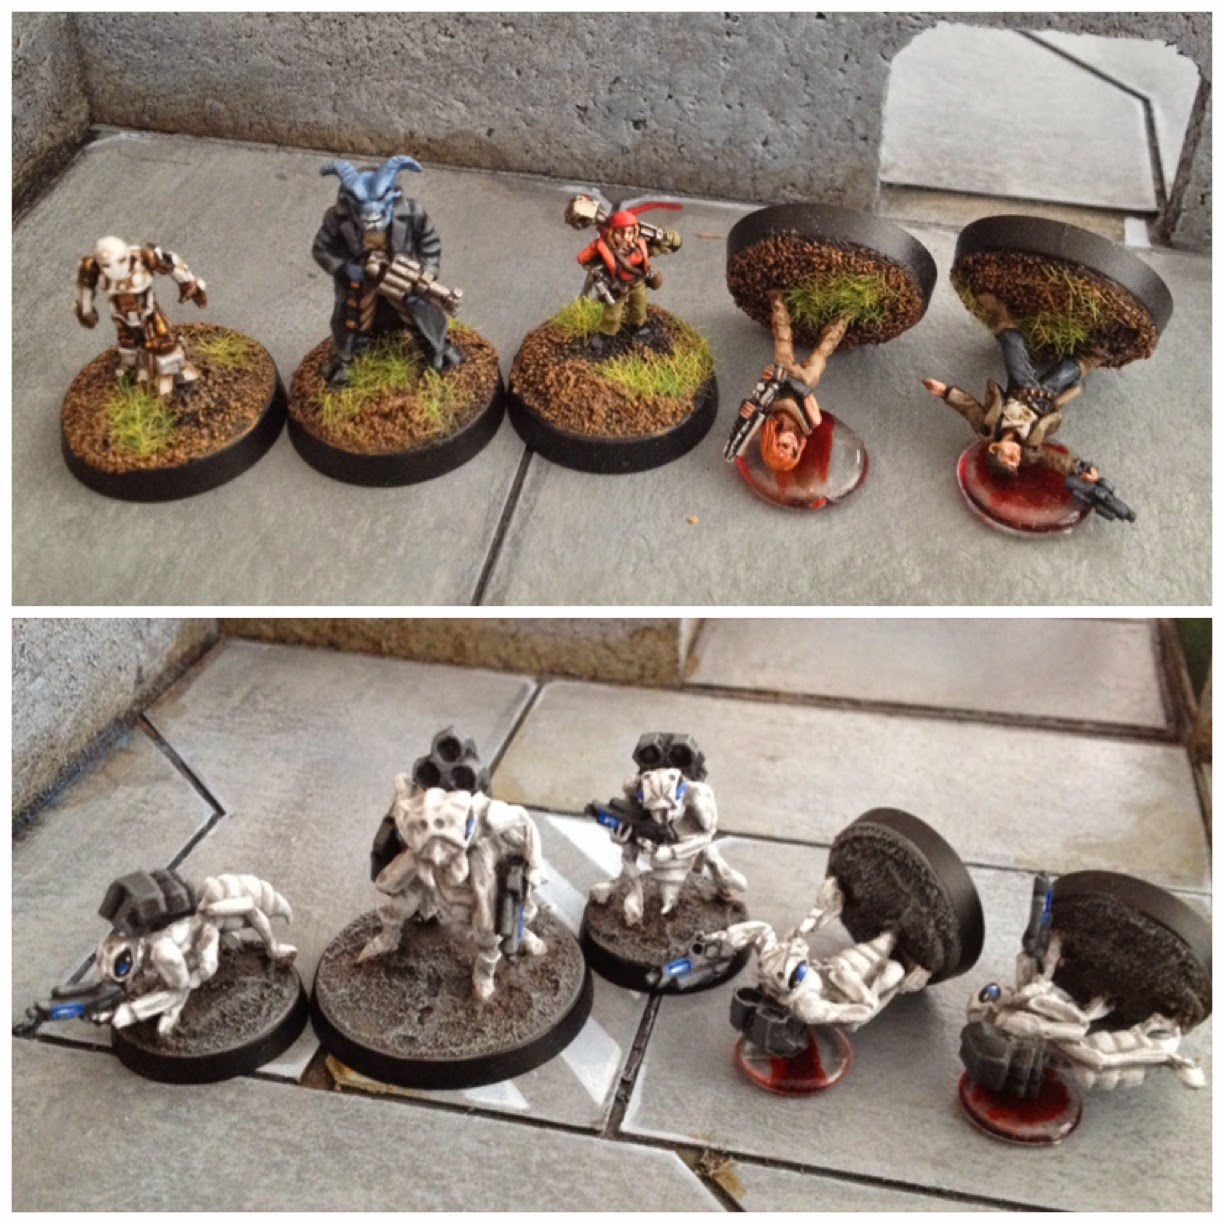
Final turns of the game
Dash and Jella grudgingly teamed up on point. A single Vespulid eluded their fire and tore Dash up in close combat. (+1 to brawl for claws is actually pretty deadly, especially when charging.) Before she could react, the alien followed up 2" and quickly dispatched Jella as well.

Mackie and Tommy 92 moved up with the crate, Tommy's shotgun making quick work of the blood splattered Vespulid. Toros used the suppressive fire mode of his assault carbine to send all the Vespulids on his flank scurrying for cover. 3 shock dice really lays down a withering hail of fire that usually results in at least a Flinch.

Another couple of Scurry turns got Mackie and T92 all the way to Bar Gyro unharmed. Toros plodded along covering their rear and laying down a lot of (Cyril Figgis-style) SUPPRESSIVE FIIIIIRRRE.

A final Fire Fight turn saw T92 flinch and dive behind some tables, leaving Mackie to crawl to the exit, pushing the crate along the floor. Success!

The butcher's bill
Aftermath
After rolling up a loot item and a trade item (Patron missions grant a trade item as a bonus) I rolled for Dash and Jella's injuries. Dash died and Jella suffered a career ending injury. Was it really internal bleeding, or was it remorse for never making up with Dash before he died saving her life? A sad end to an outlaw artist's tale.

Next episode, Toros' enemies, the UNITY enforcers will be attacking the crew. It's an Assault mission, which I think I'll do on board their ship, the Rampart. Exciting!
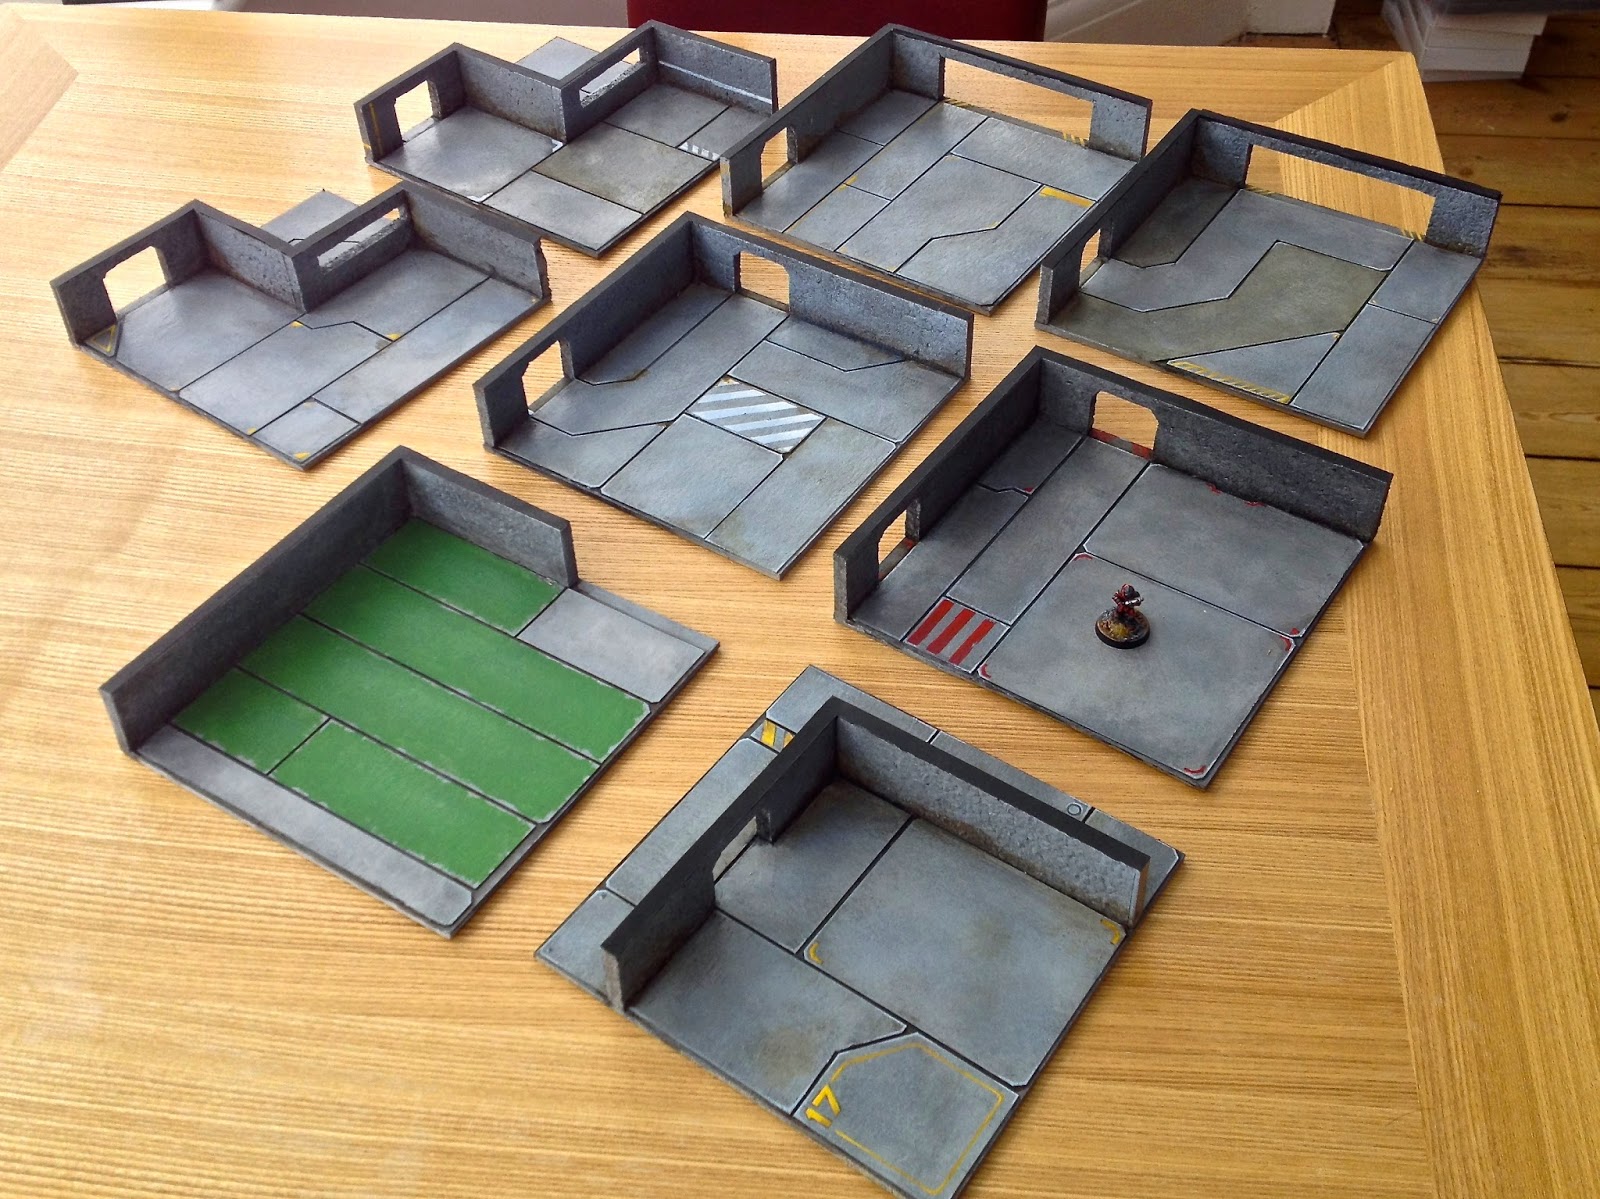
Notes
This game took place on a board only 18" square. The terrain is custom built using 6" MDF squares as bases, 6mm cork tile walls and cardboard panels for floor detail. It was originally going to be an office for cyberpunk-ish games, but watching the 2012 Dredd movie made me want to turn it into a Mega block. It's fairly generic, so works (possibly better) as a spaceport too.
I spent a lot of time planning it, going as far as to build a 3d prototype in Google sketchup to test out if revolving the modules would make an interesting enough variety of setups. As there are only 4 basic room types, each one only having 2 walls (for ease of moving figures) the build was very easy, cheap materials and straight cuts.
(Through my adventures in terrain building, I have decided that fully enclosed interior walls or too-high interior walls are the bane of 15mm gaming. If you cant easily see or get at the minis, it's no good.)

Interestingly, the even smaller than normal spaces worked fine due to the density of cover. FiveCore has a slightly unusual cover mechanic which allows a figure to "Hide" or "Peek" when entering cover or activating subsequently. Hiding figures cannot shoot or be shot at , while peeking figures can. Peeking figures are better off vs shock dice than one in the open, but otherwise quite vulnerable. Hidden figures are for the most part totally safe. I find this a really refreshing way to handle cover, but also really fun, as it adds an interesting decision to taking cover each time. My advice is the more terrain the better... Avoid just plunking down a few pieces if you want an interesting game!

House Rules
I have been using 6"+1d6" as a Bail distance instead of the stated 12". I like this for smaller game areas as it adds a small element of uncertainly when a figure runs away.  It's also the same as a Dash move, only involuntary.

That's all for today, keep your blaster handy... You never know what's around the corner on the Fringe!

5 Parsecs- Boarded!

$
0
0
After the sad death of Dash and Jella's departure, the crew of the Rampart set about finding some new members. Jann Silman put them in touch with some old explorer associates of his. "Kilo", an ex-military war-bot bounty hunter and "Muscleman" a hulker adventurer with a background in enforcement. They arranged to meet on board the Rampart for a meet up and interview.

They are interrupted by 5 UNITY enforcers led by a power armoured special agent... Havok ensues. This was an enemy assault scenario. The enforcers had to attack the engineering computer (represented by a computer console model from Khurasan) to win.

The photo shows the use of "Fiery Dragon Starship tiles"I bought ages ago. There's a lot to like about the set, which I think was relatively inexpensive. I came up with some simple rules for opening doors and gridded movement:

  • Opening a door takes the place of either moving or firing.
  • 1 square= 1", moves may be made in any direction, but a figure may not make 2 consecutive diagonal moves.
  • If a crew member can get to a security station, they can lock all the doors. Locked doors will need to be broken in following the standard FiveCore door rules.

    "Kilo" (By Thescene)
    The fight went well. Once again, Toros' military assault carbine's 3 shock dice of SUPPRESSIVE FIRRRE!!! made it very difficult for the UNITY enforcers to get into the main hold. As a figure that has fired on its previous turn cannot use guard fire, this meant that careful repositioning of Kilo and Toros was required to keep the corridor covered. A scurry turn got the power armoured agent into a good position eventually, shrugging off 2 shots thanks to his protective suit, but Muscleman managed to charge him and smash him with his power claw. Mackie finished the battle with a dramatic charge with her brutal melee weapon (a big wrench) and sent the last enforcer flying!

    When the smoke cleared, only Muscleman was injured. He sustained a wound that would force him to miss 6 turns. I decided to use my medkit to avoid this. A tricky decision, as I was saving it to prevent a death... But on the Fringe, 6 turns is a very long time. Muscleman lives up to his name, so I think it's better to have him around kicking heads than missing so many missions.
    A sterling debut from two deadly new crew members. Mackie is now the only human on board, amongst an ever increasing number of dangerous alien and robot killers! With the Vespulids and UNITY now as enemies, it was time to get off Imhotep! 

    "Muscleman" (By GZG, converted)
    The starship tiles were interesting. I think the layout was a little dull, but it still threw up a lot of interesting choices thanks to the Scurry and Firefight turns that came up when they did.

    If I use the tiles again for a scenario like this, I think random deployment (of both sides!) would better represent the chaos of a surprise hostile boarding. I'm thinking of the Firefly episode when the bounty hunter infiltrated the ship at night and the crew were all over the place.

    I've been thinking about coming up with a whole "space voyage" campaign turn that replaces a normal turn whenever you wish to change planets.

    As it stands, leaving the planet (and getting the chance to elude enemies) is a simple choice that has no down-side. I'm thinking of a simple campaign turn with "space flight" tasks instead of planet-side ones, and a small chance to be boarded or otherwise get into trouble.

    Finally, as requested, here is a photo of my station modules split apart and without all the clutter. 

    By revolving them and obeying the "no double walls" rule, a huge variety of spaces can be had in a jiffy. 

    The two lower modules were afterthoughts. The original plan was to only use 6 pieces (of 3 designs) to simulate cyberpunk office layouts. The empty walls were actually conceived as plate glass windows. 

    I've been trying to decide wether to try my hand at laser etched MDF, or sculpted pieces in resin for a fancier batch. I'm leaning toward MDF, as I think I could get some great results with the use of acrylic pieces in the windows. 
    I find MDF is extremely difficult to paint however, which is the only thing giving me pause. When I built my Mad Mecha Guy city buildings, spray paint just bounced right off. I had to hand-undercoat each one with decoupage primer in the end, which took ages and I don't want to do ever again.

    The 6 Month Mountain Reduction & Painting Challenge

    $
    0
    0
    I recently agreed to take part in the 6 month mountain reduction and painting challenge set by Chris, from Chris' miniature woes blog.
    As I'm sure most readers know, Mountain in this case is nerd slang meaning pile of unpainted miniatures... Or "lead mountain" although that term is less than accurate in modern times.

    There are a couple of caveats for me.. The main one being that my "mountain" is mostly back in Sydney awaiting sea-freight. It's unlikely I'll see it until next year. 
    Do not fear though, I still have at least a hill of unpainted figures with me, not to mention an entire Vampire-level pledge of Reaper plastics still in the box. I'm a little bit on the fence about what to do with that lot though. Do I break scale? I fear what might happen.

    So in the spirit of the challenge my first post is here (and on instagram), with a bold experiment in frugality and hobby science.


    Coffee basing paste

    I have used my old coffee grounds as ground cover in the past with reasonable success, although I just sprinkled it over wet PVA glue at the time.
    As I have run out of texture gel for basing my figures and am trying to be frugal, I splurged £2 on a small bottle of glue from the newsagent and mixed it undiluted with dry coffee grounds until it became a thick paste. I enjoy good quality hobby products as much as the next nerd, but I love finding ways to build things for free, or in this case, out of literal garbage.

    I applied it to the bases of some Space Templars and Prang that I've been keen to paint. Lovely figures sculpted by the talented Eli Arndt, and sold by 15mm.co.uk ... But with quite thick cast bases. How will it work? Will I get some paint on a mini before Mik? Only time will tell.

    The Prang

    $
    0
    0
    Here are the Prang from 15mm.co.uk that I tried using coffee grounds as basing material on last post. I worked the white armour up from grey, giving them a fair bit of depth... Although it doesn't show too well in these phone snaps. I think they look better from the back, and am planning to add some more leathery brown to a couple of them. 


    Thanks for looking!

    Vornid Support

    $
    0
    0
    It's been a long while again, real life etc. etc. On to the good stuff: New Vornid models from Khurasan miniatures, the very best miniatures for weirdness in 15mm scale!

    Vornid Walker

    Vorhounds

    Together with Vornids
    Mainly very easy to paint, although the walker has a lot of smooth surfaces, so took a while. I plan to stick some clump foliage on top, but didn't want to confuse the product shot. These minis round out the the Vornids very nicely as an alien or postnuclear force.
    As a side not, I used my dried out coffee grounds as basing material again... It's a winner.

    Thanks for looking!


    Supplies Secured

    $
    0
    0

    It's been a long time coming, but my budget finally allowed me to shore up my increasingly scrappy paint collection. I just need some cheap grey hobby acrylic to use as primer and I'm all set.
    I chose this set as I prefer dropper bottles, it comes with some brushes, I love the washes, and it was relatively cheap as bundles go. Onward!

    Jungle Terrain

    $
    0
    0

    After years of putting it off, I've finally built some jungle/forest terrain. Why the wait? In the distant past I have made several different types of forest base, usually for GW gaming. I was never happy with my results.

    Single based Railway model trees and separate base plate
    Setup: Fiddly
    Playability: Great
    Looks: Poor
    Durability: Poor
    Storage: Messy

    Railway model trees fixed to scenic base with space for models
    Setup: Great
    Playability: Mediocre
    Looks: Great
    Durability: Poor
    Storage: Difficult

    Aquarium Trees individually based
    Setup: Fiddly
    Playability: Mediocre
    Looks: Mediocre
    Durability: Good
    Storage: Easy but messy

    Here is what I came up with: Organic shaped MDF bases with a few plants strategically fixed on. Inner "plugs" of plants that fill the gaps but can be lifted out to place troops inside. In a pinch, the plugs can be used as individual terrain pieces and the bases left more sparse.

    I have tried to split the difference between looks, game function and durability (while being as cheap as possible) and am very happy with the result.

    Small piece

    Larger piece

    Plugs in/out

    Build process:
    I used 3 of these soap dish inserts from Tiger ( a cheap shop in the UK) for 3 pounds each. I am sure I could have got the same plastic plant cheaper on eBay, but this exact type of plant is difficult to find and it was an impulse buy. The dishes are quite handy as drawer organisers so not bad value.


    For bases, I cut up some 2mm MDF that I had previously (and very foolishly) used to glue pieces of a Zuzzy mat to in an attempt to make modular street tiles. I used a stanley knife with a new blade. I whittled the edges down to a slope, then used PVA glue to stick dried coffee grounds on as texture to cover the exposed MDF.

    Next, a hot glue gun was employed to stick some clumps (2 or 3 depending on base size) of plant to each base. More coffee grounds and PVA to cover the hot glue.

    The remaining plants were hot glued onto (you guessed it) pieces of broken-up cork tile, each one fitting into a gap on the bases, but not glued in. Cork tile is weighty and grippy enough not to move, and soft enough not to damage anything it's sitting on. More PVA/coffee ground to hide the hot glue.

    A sloppy round of craft paint acrylic burnt umber was slathered onto all the coffee parts to blend them into the bases, followed by two lighter shades of brown dry-brushed on top.

    Finally, some clump foliage was added. I plan to stick on clumps of static grass in future, but it's in the post right now.

    Still haven't managed to get any figures painted recently, but hoping to in the next few days. I have a ton of stuff from Khurasan waiting, and I just ordered some new Armies Army toys that should arrive soon.

    Spacejacker out!

    Footnote: Figures from this post: Special Forces

    Re-basing frenzy

    $
    0
    0
    Planning is always a good idea.

    My mind continually re-assess my terrain collection. It's almost a sickness. As I have moved so many times in the last couple of years (Back to Australia, Back to the UK, and now a new flat again) I don't have the luxury of storing it all out of sight and mind.
    Building terrain is probably the most therapeutic aspect of the hobby for me, and I'd say i devote a lot more time and energy into it than actual miniatures, although it is never my intention.

    These models are from GZG, and are all-metal kits. They were the first terrain I purchased when I returned to minis in 2010, and they have held up very well indeed. There is certainly something to be said for the durability of metal buildings! The only problem was that when I painted them, after originally basing them on CD's, I had the really odd idea that uniform straight-edged basing would be a good idea. It's not. I decided to re-base them for a third time to fit in with the jungle terrain pieces I made last post.

    This time around, I decided to return to making small clusters of terrain rather than individually based small buildings. I have come to believe this is the best way to store and set up this sort of terrain, and makes for a pleasing mini-diorama to work on. I am also determined to unify my basing scheme once and for all. Nothing bothers me as much as mismatched terrain bases (with the exception of people using medieval farmhouses in Sci-fi battles, the ultimate transgression). I should give a shout out to Chris/Deserter86 for inspiring me to do this. His heroic quest to unify his basing is inspirational!

    Next, I arranged the buildings into little clusters and roughly sketched the shapes onto the MDF. Then used a Stanley knife to cut rough shapes. I whittled down the edges to make rough gradient. Easy enough, but if you try this make sure you use a sharp blade. As the blade dulls, it becomes harder to cut and you inevitably apply more pressure, which is where cut hands start happening. I was careful and sustained no injuries.

    Whittling like a hillbilly

    Always check layout with test minis before glueing!

    Naturally, I got over-excited and tore into my city ruins terrain immediately, which has no less than 3 types of basing style and was in urgent need of refreshing!

    A vast improvement

    Something else that I wanted to do was fix a glaring error I had made when first building these ruins... No rubble! Mr. Dave Taylor pointed this out to me and he was so right. The rest of the evening was devoted to crumbling up cork tile and cutting up little bricks to make rubble piles. The only reason I stopped is because my hands were hurting from cutting the MDF (it takes some effort) so I decided to hold off before there was a mishap or hasty creative decision.
    Tonight I'm going to force myself to stop messing about with terrain and paint some overdue models for Khurasan, and then maybe get into some more of this. 

    Mail Call!

    $
    0
    0

    I made a small order from Armies Army recently to clear out some PayPal funds. Keith kindly threw in some very cool freebies and I'll be painting them up this week. I've been a fan of AA models from day one. Great stuff, time to go military for a spell!

    Armies Army- Russian Empire

    $
    0
    0

    I finished the first 8 figures from Armies Army Russian Empire range yesterday. I love these sculpts, they paint up very easily, striking the perfect balance of interest and simplicity to keep plowing through them with minimal fuss!

    One secret to getting through a lot of figures quickly is a small number of colours. These only have 3 main colours on them, so the process is very simple. Long time readers (well done for enduring the huge breaks in transmission) will know I'm not known for doing a lot of tutorials, due to basic laziness. But rejoice, a brief one follows!

    Steps 1 and 2, base colours and Strong Tone wash

    As you can see above, I painted in all the base colour before proceeding. This is an approach I use when employing an all-over wash, something I have adopted recently. I went with Army Painter Army Green for most of the figure, with Vallejo Khaki for webbing, boots and gloves, and P3 Ironhull grey for guns and gas masks.

    When dry, an all-over wash of Army Painter Strong Tone is applied sloppily with a flat brush. While wet, I quickly dab the point of a damp brush into any places the wash has pooled too much, to draw some of it out. 

    When that is dry, I do some pin-washes. This is a fancy way of saying painting just some wash onto the areas it requires, instead of all over the figure. On these guys I went over the grey areas with some Citadel Badab Black wash (any black wash or even diluted ink would be OK) to darken them some more.

    After that, each area was highlighted with it's original colour, then again just on the edges with the original colour plus some white. I eyeball the mix, but it's probably about 20% white to colour. All done!

    Almost. It's been a while since I did military figures, and I felt like adding some extra detail. The back of the leader's helmet got a chevron, then I tried a little graffiti on a few other helmets. It proved a little beyond my skill, so I stopped at what you see here. I think it may help me distinguish the soldiers when I start playing the new revised Fivecore campaign.

    Tricky helmet detail

    This last part really pushed the limits of my eyesight... And my iPhone 4s camera. I think I'm going to need short-focus glasses at some stage, or maybe one of those magnifying visor things I've avoided for so long.

    There's another batch at stage 2 sitting on my coffee table, alongside some Enemy Unknown. After that I think I've run out of bases again... Time for another Em-4 bases/brushes order!


    More Cork Terrain

    $
    0
    0

    As part of my campaign to refresh and unify my terrain collection, I decided to turn my old stepped hills into rocky outcrops, as they were really too shallow to be very useful. I recently bought some cork trivets at Tiger to make thicker hills with, and the offcuts came in handy for shaping into slanted spires. These were superglued to the hills, then crumbled cork glued into the gaps with PVA.


    A mix of 50/50 PVA and burnt umber craft paint was employed to basecoat and seal the fresh cork, then 2 layers of drybrushing finished them off. Some static grass here and there, job done. These will combine nicely with both my shanty buildings and jungle pieces. If you're working in 15mm, you really don't need to bother with polystyrene or pink foam... Cork is heavier, stronger, easier to glue, easier to paint and less toxic.


    More Armies Army figures

    $
    0
    0
    Enemy Unknown!

    Here are the Armies Army Enemy Unknown all done. I had real trouble deciding on a colour scheme for these and almost did them (space)Wolf grey. I went with this scheme with modern video games loosely in mind. It's a light grey/dark grey with teal lights.

    The dark grey parts were an afterthought that really tied them together, but was quite a bit of effort to get looking right. Working with two tones of grey as main colours is tough to balance. Luckily, these sculpts have quite a lot of hard edges on the face and armor to highlight.

    The eyes were just washed with thinned teal paint, then dotted with white. I'm pleased with the result to effort ratio! I liked it so much I went a bit nuts with some OSL on the support weapons and leader's arm computer.

    Inspired to do more lighting effects, I finished off the Russian Empire figures, as I had a few specialists left to do.


    These guys (and some un-pictured troopers) rounded out the Russian Empire figures I ordered. With what I have painted, a campaign around a platoon and it's assets can be easily run. These specialist just ooze character, and were a treat to paint. While I was on a teal lighting kick, I threw on some glow on the chap's iPad. The extra splash of colour really helps liven up the unit, as the basic uniform is suer-drab. All the figure's scopes got a teal lens and highlight too, although barely visible.

    Exhausted by all this output, I dragged out the remaining bits of city ruins in my collection and re-based them in front of TV. There is a lot of dry brushing in my future, but its very satisfying to have my terrain all shaping up cohesively.

    Space Knights

    $
    0
    0
    Left to right: Warrior, Elf, Paladin, Rogue
    Edited April 13 2015

    Some nice minis from 15mm.co.uk I just finished. The dual wielding fellows are conversions (done last year!) pictured below.
    When I posted on instagram, I mentioned the archetypes of warrior, ranger/elf, paladin and rogue being the inspirations. This was a development of being inspired by the video game "Destiny" which I have played a lot of with Mik (of Mik's minis fame) and an international cast of misfits. Sadly, our imminent vanquishing of Crota on hard raid  mode has been totally derailed by my internet troubles. I moved house and my ISP bungled the order twice, leading to almost 2 months of down time (fingers crossed for this Friday).

    So, the first one I did was the blue-bladed "paladin" which is very much in the Destiny cover art palette. When I got to the other three last week, I wanted them to look very distinct, so pushed further into classic adventuring ideas.

    Pin vise for holes and paperclip for pins

    Superglue to fix, Pro-create in the gaps

    Frostgrave setup for £10

    $
    0
    0

    I’m back again with a little post about a frugal gaming project that got me painting again. Frostgrave is a little game published by Osprey that has crept onto my radar largely due to Instagram. When I saw the hardcover rules on Amazon UK for £10, I snapped them up. The title is a little deceptive, as I only spent this £10 for the rules, already owning everything else I have used… Although I did pay for the supplies and figures long ago.

    At first I thought I could use my (never opened) Reaper Bones Kickstarter package for miniatures, as it is a small skirmish game that only requires 6-10 figures for a starting faction. The requirements are basic fantasy so will work with just about any figure range. “Hey, use figures I already own, that’s cheap!” I thought. Then I started thinking about terrain. The Bolt action plastic hamlet looked perfect.

    But after much planning and deliberation, I realised that getting into 28mm was just going to be expensive and a storage hassle… Not exactly news, but I resolved to stick to my 15mm guns instead. The Bones went onto eBay and I dug through my unpainted figure supply. Copplestone castings 15mm range still outshines all others in my mind, so I immediately tested an idea for snow basing on the ones I already had painted. The method is incredibly simple, it’s just the same texturing paste (acrylic artist medium) I use for basing, only unpainted.


    All these terrain pieces were made out of cork tile scrap cut into bricks and superglued together. I also used a couple of old 28mm 40k resin ruined walls I had lying around. Coffee grounds were glued to the MDF bases as ground texture. Once painted, a little winter static grass and clump foliage was applied to add interest, then the acrylic medium was applied with an old brush to create the snow effect. Crucially, I didn’t have to buy anything to make this stuff, as I already had all of it on hand.


    Of interest is the fast painting method I used. Each piece was base-coated in burnt-umber craft paint. Then the stone areas were roughly drybrushed with space wolf grey. A light drybrushing of pale grey, then a little white finished the job.
    The brown base coat really adds a natural feel, plus has the added bonus of making the ground easy to paint with just a light drybrushing of mid brown. I found it really interesting that departing from accepted wisdom (which would have been a black, dark grey, light grey progression) not only got me there faster, but had a better outcome.

    The base board is my old 16” framed square with a Zuzzy mat in it. I dry brushed a bunch of light grey and white all over it to look snowy. It is quite possible this will be too small, but hey, I already had it so it was free. It's perfect for Open Combat (another yet-untried set of rules I have in PDF form) so won't be a total waste if it doesn't work out for Frostgrave.

    I’ll possibly order some barbarian archers at some stage, as I do lack ranged troops. Nevertheless, my collection has plenty of other figures to paint up in the meantime, certainly enough to test the game and see if it’s worth continuing with. If not, no biggie… It was only a tenner after all! I'd promise to come back with a play-test, but honestly I don't know when that will occur. Maybe soon, maybe not :)

    The rules are interesting. While the theme of the game is loosely like Mordheim, it is mechanically very different in just about all areas. The meat of the game is actually spell interaction as far as I can tell, and it has a much more modern feel with it's activation sequence and opposed d20 roll system. I should add that while I was a huge Necromunda fan, I never enjoyed Mordheim at all, which is further testament to my interest in Frostgrave.

    Til' next time!

    Frostgrave Warbands

    $
    0
    0
    I'm almost ready for a game of Frostgrave now that I have 2 warbands painted! One is made up of Copplestone castings Barbarians and Nothmen, the other is Orcs and goblins from the Blood Dawn range. All figures pictured were based and undercoated in one session, then completed over a long afternoon/evening (half of the barbarians were already painted and only required base decoration and some touch-ups).

    Practice with the Reeves coarse acrylic medium used as snow effect has yeilded improved results. Sometimes applying a little more once the first go has dried is a safe way to thicken up the snow without getting it all blobby.

    Apprentice, Wizard, thug, Templar

    Infantryman, Thief, Infantryman, Treasure Hunter
    Starting warband 500gc
    Apprentice, Wizard, Archers

    Thief, Barbarian/Templar
    Goblin Thugs
    Starting warband 500gc

    The Orc Wizard still needs some facepaint and maybe some decorative detail on his clothes. I'm working on some skeletons (Blood Dawn) which are a lot of fun to paint... I think I'll order some of the Blighthaven ones to supplement them.

    It's interesting to note that I always get on with a project much faster if it has a theme, rather then the more common "I could use this for a number of things" plan.
    Additionally, figures and terrain built for a specific theme tend to look significantly better than ones that could be used for a variety of themes. When you aim for "generic, you rarely get exciting results.


    Insurgents

    $
    0
    0

    Mysterious freebies!
    Insurgents
    Welcome back! I recently ordered Osprey's Black Ops rules from Amazon and ordered some insurgent forces from Armies Army miniatures to use with them (1 squad and a command pack). Black Ops didn't grab me once the book arrived (though they seem a fine set of rules) But the minis are lovely. The ever-generous Keith also threw in some loose freebies. This moved me to actually do some painting, my first for 2016!

    I'm thinking these will sit nicely with my older AA minis (now available from Brigade in the UK) and form a decent near-future looking force. The mysterious red-armoured chaps will make good elites and the Rusk minis will work fine as special forces.

    You may have noticed that15mm Frostgrave didn't happen... I wound up deciding it wasn't very solo friendly and quickly lost interest. No regrets though, as I grabbed a copy of Dragon Rampant fantasy rules with some Christmas gift voucher action and am quite excited to try them out.

    Here's to a great 2016, with more painting than last year :)


    Clearhorizon Omega Squad

    $
    0
    0
    Mr. Harold sent me these a while ago, and I finally got around to painting them. The delay was mainly that the neck length bothered me, so it took a while to get around to converting them. All I did was slice off the heads, file down a tiny bit of neck and re-pin them back on. The difference is very small, and I imagine some people wouldn't even notice it, but I really like the new look.


    These figures would make great cyberpunk operatives, and I nearly went that way with them, but went with a military mercenary theme, not wanting to do them too dark.
    There is a lot of extremely tiny detail on these minis, a lot of which wasn't obvious until an undercoat and ink wash. I had to use a 00 brush to do many of the highlights, and I normally only ever use a 0.

    Excellent figures, from one of the industry's best chaps. Grab some!
    Viewing all 38 articles
    Browse latest View live